I think, it’s quite safe to say that 2020, has been an insane year.
I didn’t do my usual post at the end of 2019; and I didn’t do much for the start of this year either with my blog. There’s a lot of reasons for it; but on both a personal level, and indeed a global level – I think 2020 is a year that my generation will remember for quite a while.
It’s a year in which, the global markets stopped, then through sheer force of will, continued on. The age of the internet and remote services & tools were forced into a level of maturity that up until now, were only something the novel few could dip their toes such waters. Indeed, my own blog post (this post you’re reading now) is all about figuring out being able to work from anywhere, at any time.
2020 brought with it, COVID-19; which brought with it – significant health risks, and significant situations to my life that honestly, I never thought I’d see.
2020 was actually going to be a rough year for me anyway, as I moved towards focusing on caring for my elderly mother. I’d moved back home, and have been deciding what to start discarding in an almost Marie Kondo-esque fugue state. My home has always been filled to the brim with old knick knacks and gadgets, not to the excess you see on Marie Kondo’s show, but still – quite impressively full of old tech, clothes, and furniture.
There’s a lot to keep track of, and I’m in the process of decluttering my life. To do this, I’ve turned to a really interesting application that my friend and colleague, Matt, has pointed me to — Notion (https://notion.so). It’s kind of an all-in-one workspace style data collection application, kind of like Evernote.
It works across iOS, PC, Linux – it’s a web based application that’s very responsive. It provides a great way to take notes and keep organised, especially in the current hellscape of things in life right now.
Most of my work nowadays, involves documenting, designing and guiding the team I’m in charge of – and similarly, the importance of documentation has started to become all the more apparent to me. For a while now, I hadn’t been able to find the right system that’d let me create something of a private knowledgebase/wiki that I liked.
Cue in, Wiki.js – a gorgeous looking Wiki package, that while still very much in development – also very much runs with how my online infrastructure is designed. It’s powered through some docker-compose configuration, it has both git and local file backup capabilities, and lets me mount my data as I see fit.
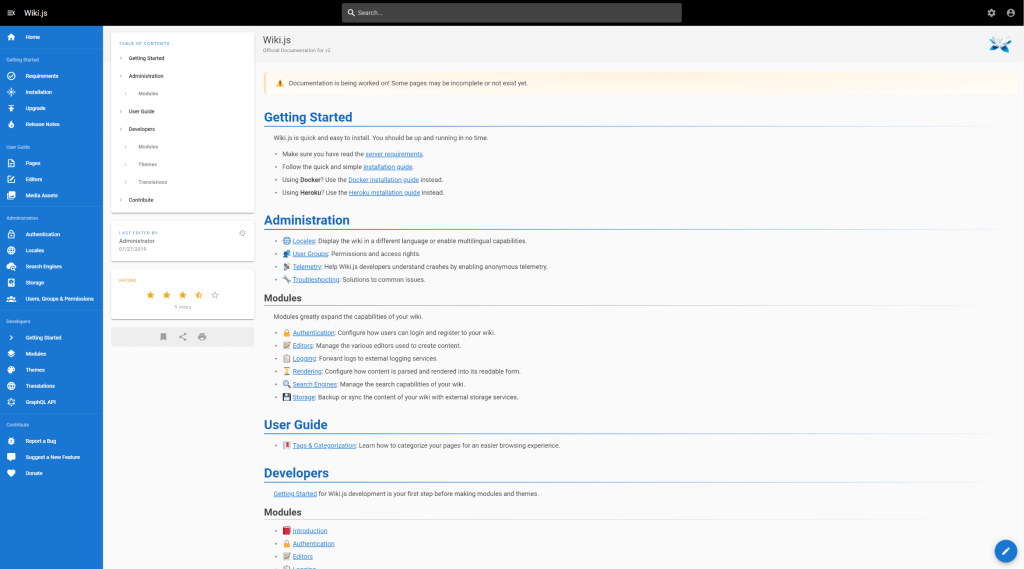
It’s not the most complete application right now – still being heavily in development, but it does some things better, and more beautifully than something like BookStack my previous Wiki of choice. And it doesn’t have the fluff of Confluence from Atlassian either.
A winner in my books.

Over the weekend, I wrote a service loading daemon for my Minecraft server that essentially allows me to interact with players to create custom, scripted actions and dynamically run commands – all tied into a Database thanks to the comfort of PHP!
I’ve aptly named the system the Minecraft Assistant Interactive Daemon (MAID for short). So far things have been working wonderfully but we’re still exploring the possibilities with this tool; from gathering player positions, to inventory security, and more! The system is based around a PHP script running in a ‘daemon’ mode that never times out, and monitors the console of the server – it reacts to things that then happen via the console (picks up commands, events, and so forth) – and updates as needed – be it via a website, database, or otherwise.
A big benefit of how I’ve implemented MAID is that I can run a Vanilla based Minecraft server, that still allows for the latest versions released by Microsoft to run – without essentially affecting functionality.
The current plan is to have:
- Custom vault control – players can protect valuables in a web-managed inventory/delivery system
- Production of materials – a “maid hiring” system, where players can pay an amount of emeralds for various maids that’ll help them acquire resources
The system is essentially a PHP based plugin wrapper on Minecraft – it doesn’t directly interface or interfere with the Minecraft client’s functionality, but instead runs as a parallel service alongside the server. So the only real drawback is a lack of real-time in-game interaction and even then, some degree of interaction can be created via the command-block system; all the features of Command Blocks are directly accessible to the MAID system.
I’m keeping it in a private repo for the time being; but in the near future I might look into releasing it 🙂
This blog entry is more of a personal reminder – and now it’s somewhere on the internet in theory it shouldn’t ever disappear.
I do a lot of PHP related coding in my day-to-day. Be it website projects all the way through to browser-based applications, both professionally and personally – I think I’ve hit a point where VS Code – my editor of choice, is finally covering almost all my use cases.
The extensions in question:
- Alignment by annsk
- Diff by Fabio Spampinato
- Docker by Microsoft
- Format HTML in PHP by rifi2k
- GitLens by Eric Amodio
- PHP DocBlocker by Neil Brayfield
- PHP Symbols by lin yang
- phpcs by Ioannis Kappas
- Prettify JSON by Mohsen Azimi
- TabOut by Albert Romkes
I’ve always been tinkering around with Gitlab, GOGS, and other various services like Github, Bitbucket, etc. to try and store my code in some place that’s not as fallible as the personal servers and storage I keep around. I’ve recently stumbled across Visual Studio Team Services (VSTS) which seems to be an outstanding offering from Microsoft (I already use their free Visual Studio Code editor, which does a stunning job as my editor of choice)
It’s pretty cool so far, and I’ve started moving across some of my GOGS hosted repos to it, so that I have less reliance on my own paid services; it’s cost-saving for me, and VSTS actually has a really nice deployment/testing Pipeline creation tool. It’s nearly entirely drag and drop, and save for a few little bugs, it works perfectly for my personal needs.
Just for my future reference, when running SSH CLI commands, I need to disable fail on STDERR as git will write to the STDERR for any git results, meaning it’d make the build fail; which we don’t want!
…save for a few little bugs, it works perfectly for my personal needs.
Secondly, I think I’ve also settled on using VIsual Studio Code as my pseudo-IDE of choice. It has quite an expansive toolset that I can bolt onto it that really lets me control and do actions for nearly everything. For it to qualify as a full-blown IDE would mean the integration of a browser window so I never have to leave it.
I’ve been using Visual Studio Code as my editor of preference for the past 6 months or so at my current workplace; and I’ve grown accustomed to it, even if some people consider it a bit slower than other editors, or slightly less functional than an IDE. So far, it has met my everyday needs, and I think I’m fairly comfortable in saying that it is my tool of choice for development.
The combination of these tools, now means that I’ve got a development process available to me which does away with the extra resource usage of hosting my own code repositories; and allows me to build smooth, integrated pipelines that’ll deploy my projects as needed.
They all roughly follow:
- Create a project;
- Master, Release, Develop, Feature and Hotfix branches as per Gitflow
- As each Pull Request merges into Master;
- SSH into servers using Private Key
cd /to/deployed/production/folderandgit fetch && git reset --hard origin/master
Some notes:
I’d execute any particular unit tests as required, in between steps 3 and 4. And I am aware that following Gitflow for a single developer project is probably overkill, but it’s a practice I like to keep familiar with, as I use it every day in my day-to-day job where there’s more than just myself developing code on a project.
So, I’m going into the final month of probation at my current job; my project Cloud Citizen deployment has actually already started upgrading and now I’m moving from a laptop system to a desktop system to host my personal cloud services. The machine itself is a gaming-grade desktop, running Windows 10 Professional, and I’ll be enabling Docker on it to provide additional services I might need.
Specifications
- AMD Ryzen 7 1800+ CPU (3.6GHz)
- 16GB DDR4 16-18-18-36 3200MHz RAM
- 2 x 10TB HGST 7200RPM HDDs with 256MB Cache
- 1 x 250GB Samsung Pro M2 SSD
- ASUS Turbo Geforce 1070 GTX 8GB Card
It’s significantly more powerful than my laptop, with enough resources to last me a couple of years I’m hoping. It’s sitting in an old Fractal Design Core 1000 case (circa 2008) that’s really, just barely holding together, haha! I’m using the AMD Wraith Max from my recent home desktop upgrade (AMD Ryzen 7 2700+) to cool the Ryzen 7. It seems to be working extremely well!
It’s all in the Services
So, unlike the laptop implementation of my Cloud core for Cloud Citizen, I’m going to be rolling out services on JT-CXS almost entirely exclusively for myself, and provide provisional, temporary access to others as needed. I’ll be running a number of consistent apps that passed muster when I was running on the more fiddly JT-NXS system.
Services
- Plex – personal media streaming and organisation
- Ubooquity – personal eBook/Manga library resource
- Parsec – 60fps 1080p gaming streaming to my devices at home, and on-the-go
- Jump Desktop – iOS compatible desktop streaming at high FPS
Primary Roles
Cloud Citizen’s new machine – JT-CXS – still maintains it’s role of being my core computer, to enable me to work remotely from anywhere with a reasonably fast internet connection. It should let me:
- Develop software projects (Git, Visual Studio Code, Git Bash, Sublime Text, WinSCP)
- Plan the software projects and ideas I have (Zenkit, Visio)
- Work on Documents, and Publications (Office)
- Work on Media Production and Development (Adobe Creative Cloud)
All in all, with the extra grunt this machine provides – I’m really looking forward to being less restricted in all the things I can do over a cloud connection; and really, start looking towards using my iPad or ultralight notebook as my primary physical device.
An Every Day Carry (EDC) Kit
So – with my gadgets, I’m hoping to eventually reconstruct an EDC Kit that I can use to travel with. It’s all a little interconnected really – the investment in Cloud Computing means I can offset the processing power I need on-the-go; and make a lighter EDC kit for myself so that I can catch public transport, and manage myself when I’m out and about – which in turn means I’m more likely to use my car less (thus lessening my carbon footprint, and saving some dollars in the bank).
As the final component of Project Cloud Citizen – I think it’s pleasing to say that in this final week, a device has surfaced (from when I was cleaning my room and assembling a shiny new wardrobe system) that provides an answer to the gaming shortcomings I had previously by basing myself entirely on an iPad!
My EDC is very technical and work focused – and the three primary pieces of equipment in it, are the GPD-WIN, my iPad, and my journal. These are discussed below.
Introducing the GPD-WIN
For solely gaming – the GPD-WIN is the device I’ll use.
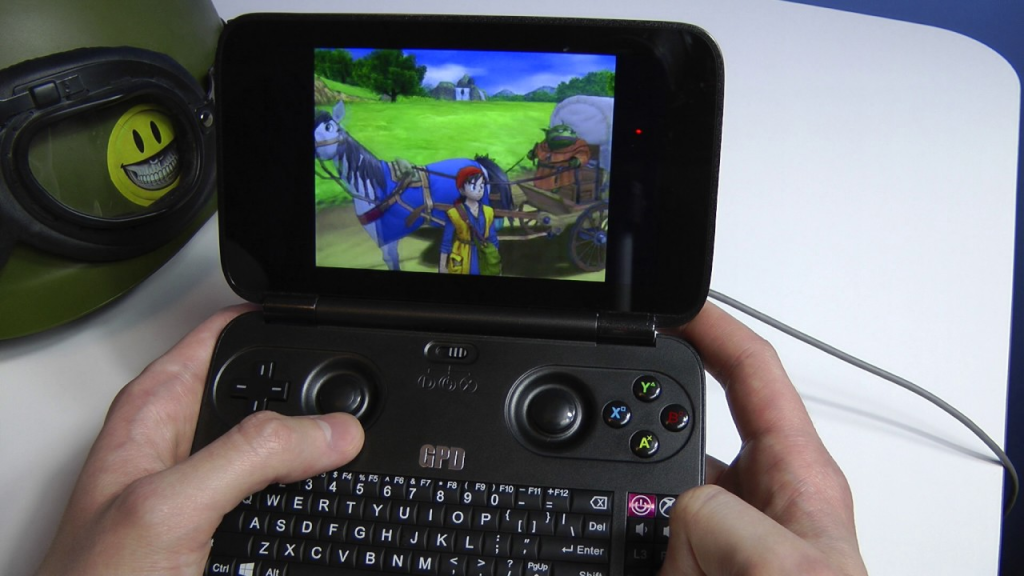
It was a perfect solution to being able to carry a device everywhere that’d let me game via the built-in Xbox Controller, and if need be, I could plug in a keyboard and mouse!
So, a couple of years ago, I bought a GPD-WIN, to try and carry around a pocket console for emulation and on-the-go coding, etc. Now at the time, I didn’t have JT-CXS to offload all the GPU processing to, so I was limited in the extreme to whatever the GPD-WIN itself could handle. Which really, was pretty much nothing beyond PS2 ROMs.
However, the device was capable of running Windows 10, and while that left next to nothing for storage, I didn’t need the storage – I could use the device as a thin-client for access to JT-CXS. It was a perfect solution to being able to carry a device everywhere that’d let me game via the built-in Xbox Controller, and if need be, I could plug in a keyboard and mouse! This meant that whilst I’m out and about and on-the-move, I had full access to my Game Libraries, and could play most modern games (and by a stretch I could use the terrible joystick-mouse mode, to play non-WASD games such as Civilization VI).
The iPad, that old workhorse
My iPad is a pretty special solution – it’s the entry-level iPad Pro 9.7-inch from 2017, and surprisingly, it’s been extremely helpful, despite a lack of 4G. When I get a chance to upgrade, I will be sure to get a device with Cellular capabilities.
The iPad will primarily be used for:
- Coding on-the-go
- Browser/Media Consumption
- Design + Planning
- Forex trading and financial management
The Bujo (Bullet Journal)
Bullet Journalling has changed my life. Seriously, it’s become a day-to-day system that helps me manage and self-reflect on a level that no digital system has ever been able to achieve. It’s a simple (or as complex as you want) system of writing a daily log in a book that helps you compartmentalise and keep track of all the crap that’s flying around in your life. I’ll probably blog a bit more about this later on, but here’s the intro ‘how-to’ video:
I use the Moleskine Soft Squared Notebook (L) to keep my Bujo in order; expensive, but I love the feel of the book in general, and its simple, unassuming, no-nonsense design. In fact, I’ve just made a note to myself to start working on buying more of these notebooks so I don’t run out in the future.
And so we come to the end of Project Cloud Citizen. Sure there are tweaks and fixes needed, but for the overall part I’m able to travel around with a newly organised EDC bag, and perform all the duties and tech work I need, without breaking a sweat, or being chained down to a desk now. It’s not complete freedom, it’s just usingi the power of the cloud to extend that ‘leash’ I have to my work, so that I can move around and enjoy what I need, whever I need.
So, I’ve never really been shy about using linux as an Operating System for my web servers; be it Debian, Ubuntu, CentOS or otherwise.
However, for the first time tonight I’ve decided to roll out Linux on a desktop that I’ll be using; it’s for the bedroom, where I might do some blog writing, or check my email, and some general productivity basics. Enter Ubuntu 18.04 LTS Desktop edition. Yup, that same Bionic Beaver version I was kidding about on Twitter a few days ago; I’ve started using it.
It’s only been about 15 minutes (the install itself took an additional 5 minutes on top of that) but within that 15 minutes, I’ve got Visual Studio Code running, I’m writing this blog post, and I’ve started installing Git. Seriously, from start to finish, that’s an incredible turnaround speed at which I’ve booted into the OS, started configuring it and immediately become productive.
I haven’t really gotten elbows deep into the guts of the OS in terms of customisation, but hot diggity there’s already a few nice things I like about it:
- I’m using my 34″ ultrawide as my default monitor in the bedroom, the 3440 x 1440 resolution is natively supported
- The whole interface feels really snappy and quite intuitive!
- I got VLC and Spotify running almost instantly (I had to login to Spotify, that was the biggest delay)
- Parsec streaming is no nonsense for when I need to use Windows stuff (Games, Adobe Suite etc)
So far, the OS does all the usual stuff I need, with the exception of gaming, but that was always the intent with a machine in the bedroom. The last thing I want is to be gaming and disturbing my significant other in the middle of the night.
Overall, really pleased with the OS. And can foresee myself using it more often from now on!
This is mostly a personal note on how to setup a workflow with my Web Development (PHP/MySQL & Docker based) projects. Usually, with pretty much any project, the workflow goes as follows:

Figure: My workflow prior to this article
To host my own repositories of codes per project, I actually use GOGS which is short for Go Git Service – it’s written of course, in google Go, and is essentially a self-hosted Github clone. It’s by one of the devs from the Gitlab team, and it’s far more lightweight and easier to use in a personal scope, than Gitlab (Gitlab is still wonderful, but I think it’s better suited to teams of 2 or more people).
Git hooks are amazing!
The above workflow diagram though, is missing one really critical stage – getting the code to production – a.k.a. deployment. Typically on any deployment, after the above workflow, I’d either remote in, or set up a cron job to pull from master. There’s some problems with this method of doing things:
- I’m doing a git pull which is based on merges, and can really cause some shit if there’s a conflict (there shouldn’t be, but just in case)
- I’m remoting into the server each time I have to pull for some commits, this takes up time. I’m a serial commit/push-as-save person
- It’s completely against the ethos of a developer. If I’m doing something repeatedly, I should find a way to automate it!
So, enter stage – Git hooks. Git hooks are amazing! They’re actually natively supported by Git (powered by Git) and I only really just started learning about using them. I vaguely recall encountering them earlier in my growth as a dev, but I must’ve shelved it at some point and given up trying to learn hooks (probably around the same time I cracked it at Drone CI, and Jenkins CI/CD).
Anyway, the overall concept of using a Git Hook is that I reach the final stage of the workflow I drew at the start of this article Git push to remote repository – the idea is that the Git repo then registers this push in something called a post-receive hook. It then performs some functions and essentialy plonks a pull of the latest code of my repo, into the production environment.
At first, I started off with something super simple, from my jtiong.com (this website!) repository as an example:
#!/bin/sh
ssh [email protected] 'cd /var/www/jtiong.com && git fetch && git reset --hard origin/master'
Unfortunately, this didn’t seem to work. I kept getting remote: Gogs internal error messages, and figured out it was something to do with my SSH keys not working in the authorized_keys and known_hosts files of the docker container to server shell and vice versa. After a lot of Google-fu and tinkering around, I eventually came up with the following which worked (note, it’s been edited to be a generic solution).
#!/bin/bash
ssh -o StrictHostKeyChecking=no [email protected] -p 22 -i /home/git/.ssh/id_rsa 'cd /project/folder/path && git fetch && git reset --hard origin/master'
It’s not entirely necessary, but I used the -p and -i options to specify both the SSH port and identity file used with the SSH connection (just for greater control, you should be able to remove them, your results may vary). The key section of the above command that I want to highlight is the -o StrictHostKeyChecking=no option that I’ve set. This got rid of any Host Key issues between the docker container and the host server for me. So if you’re encountering issues with your Host Key Verification or similar, this might fix your problems!
With the git command now, I used git fetch && git reset --hard origin/master instead of just doing a git pull. Why? Because git pull uses merge methods and can result in some conflicts with code, and issues that are just messy and a bad experience to untangle. Using git reset, moves the code’s pointer to a different commit without merging anything. It just overwrites it, making it slightly safer for deployment!
But of course… Why do things in just a simple way? This particular hook configuration is great for something like my personal site where I don’t mind if I’m pushing breaking bugs to production (within reason). However, when I’m doing work for clients, I need to be a little bit more careful – and I use a more typical production, staging, development branching method with my Gitflow.
Here’s what I use now:
And wonderfully – this lets me have separate branches, as required and updates the appropriate (sub)domain as needed! The wonder of Git Hooks has now streamlined how I develop projects, and deploy them in a much more pain-free manner! And so I dramatically take another step in my journey and growth as a developer haha 😛
Project Cloud Citizen has been a resounding success; it’s literally waiting now on two time-sensitive issues:
- I pass probation at work so I might have more leeway in the machine I keep in the office to use for this project;
- I decide to either use a laptop, or become almost entirely iPad based
I’ve got a generation 1 iPad Pro 9.7-inch, Wi-fi only, 32GB tablet. It was purposely bought a few years ago as a bare minimum use device for purely media consumption, but thanks to Project Cloud Citizen — it’s wonderful, it lets me do just about everything with it short of solid code development (Using docker etc) although that is already solved in the project through the really good RDP client that Microsoft makes for iPad users.
“…it’s purely from a gaming perspective that I’m holding back…”
The iPad solves and makes comfortable, an idea of having a clean, sleek slate that acts as a window into my digital world (hah, a window to Windows basically) and lets me roam around pretty much anywhere with sufficient download speeds, and minimal upload speeds – while enjoying the power of hardware that is usually not within reach in those locations.
In fact, it’s purely from a gaming perspective that I’m holding back from not even needing my laptop as I can do everything either via RDP, or directly here on the iPad itself (I’m in fact, writing this blog post on the iPad right now!). So, that leads me to think about the following options:
- Do I research exhaustively and figure out a way to remote game with my iPad (this will most likely involve money)
- Do I just make do? 70% of the time I’m gaming, will be at home, with the remaining 30% being remote on travel/visits/etc.
- Probation ending, means I’ll be able to implement a small Mini-ITX machine at the office, thus once again, freeing my laptop as a client
Option 1
Option 1, is of course, the hard way. And what would this experiment be, without trying to figure out things the hard way? There’s a variety of ways to cope with the use of the iPad as a thin client; including jailbreaking my iPad to allow it to function with a mouse, through to actually buying an iOS compatible (with specific apps) mouse. While it’s not awesome that I have to spend money for a solution, it is acceptable, as I’m paying for something that’s a bit outside the box (for most Aussie PC users), so to speak. A quick bit of Google-fu tells me that I’ll need something called the Citrix X1 Mouse, and the Jump Desktop application totalling something like, $120.00 in expenditure.
The Risks
I won’t actually be able to see how the X1 mouse feels, so the risk is that it is completely terrible for gaming, although the Jump Desktop videos briefly demonstrates some gaming with the X1 mouse (on games I’ve never seen before). So, that’s pretty much the biggest risk, I’ll be spending money on a mouse I don’t want to use, and once I have it, I might lose it because it’s wireless.
The Negatives
It’s an iPad. The main comparison I’ll be doing is against my laptop as a client.
The screen isn’t going to be very big, the keyboard isn’t as nice as a full-size mechanical keyboard, and there aren’t as many keys/options/shortcuts I can hammer around. It’s not as powerful as my laptop, in a pinch.
Local storage does become an issue as well – the laptop has 500GB built-in, whereas my iPad comes with 32GB built-in. The workaround is thankfully available in the form of lightning-connector USB memory sticks; however this still remains a negative as I’d have to carry around a whole bunch of them to meet my storage needs.
Finally also, I’m dependent on the existence of Wi-fi or a 4G tethered connection. There’s no real workaround for this aside from making sure I get a Cellular data-capable iPad when I upgrade in the future.
The Benefits
In terms of mobility, ease of use, the iPad is king. Even with carrying an extra mouse it’s still king. My laptop provides awesome functionality, and even more power; but as a thin client it does almost exactly the same stuff as the iPad. The iPad lets me use the pencil, keyboard and mouse to do all sorts of stuff, whilst all being completely silent, and functional, even as a spare camera in a hurry.
I can flip it open, or turn it on and it’ll wake instantly and I can get straight to using stuff. If I ever wanted to draw or plan a diagram, there’s an app for that (at this stage in the iOS evolution, I think that phrase is pretty much biblical now) – my Apple Pencil is hands down the best stylus I have ever used; if I need to do something more meaty than email, web and media, I can remote into my Cloud system and do it. I’ve got significant bandwidth on my 4G phone with tethering, so I’m not concerned about data limits right now.
My iPad is in a gorgeous real leather case that cost me a very pretty penny, it’s a joy to handle, carry around and appreciate. It’s smaller and quieter than my laptop too. It still has a headphone jack for my headsets, and it has a fairly comfortable keyboard/screen protector for it (an authentic Apple Smart Keyboard – admittedly in its 9.7-inch flavour which is no longer available).
The iPad is silent in operation. I can’t stress how amazing this is for me, either. My current laptop, while it’s a slim, sleek powerhouse – sounds like a jet engine ready for takeoff when anything starts to write to the SSD in it.
Option 2
The problem with Option 2 isn’t such a big one. More and more of my time in entertaining myself on my gear is passive entertainment (music, movies, TV, etc.) as opposed to interactive entertainment (games). However, it does defeat the purpose of Project Cloud Citizen. Ideally, the intent was to do everything via a thin client (in this case an iPad Pro) in the cloud.
In fact, it’s already the option I’m currently using per se.
The Risks
None really, I don’t have an extra mouse to lose, and I can still do everything I was going to do as a remote cloud user short of gaming.
The Negatives
I can’t game. I can’t show friends games, and I can’t enjoy the full power of mobile computing through the cloud on this device using just a touch interface. The touch interface is a nightmare to use on Windows RDP; buttons are still fiddly, and doing full productivity in something like Visual Studio Code, then alt-tabbing to do something in Photoshop just won’t work. While possible, it requires re-learning everything and there’s a lack of precision that a mouse pointer offers.
It affects workflow and productivity on top of the lack of gaming abilities. To me, this single handedly makes Option 2 unviable.
The Benefits
No extra equipment needed, as I can already do this now.
Option 3
Finally there’s the ‘long play’ option. This involves a few serious steps however. Once probation is over I have the room and space to deploy a mini-ITX PC at my desk. There’s some risks and negatives involved that would make me consider Option 3 as a ‘next evolution’ kind of step to the whole project.
The Risks
This is absolutely the most expensive solution to the project. It involves buying essentially a whole new PC. Hardware compatibility, configuration, etc. All the usual caveat emptor situations apply with building a new PC.
Moving to a full blown PC also means there’s issues with configuration for headless gaming.
The Negatives
Again, the price. The hardware configuration. A lot of the drawbacks of the other options no longer exist as the power of a full desktop experience comes into play.
My laptop acting as a client might work well, pending fan sounds, portability (it’s not that portable) and battery power too. My laptop itself is already quite powerful, but it weighs more than an iPad.
It has a horrible thermal solution that makes it sound like a vacuum cleaner, and packing away the laptop heats up the bag as well immediately after use; not to mention the actual temperature of the laptop when in use.
There’s a lot that I dislike about my laptop, which is why it hardly gets the usage it deserves – it’s nowhere near the sleek experience I had with the Apple MacBook Air. And in a strong sense, it’s further justification for me to use the laptop as a hub for Project Cloud Citizen, and then migrate to a PC as the next step when the laptop starts to give out.
Parting Thoughts
All told, Option 1 seems to be the way to go, with a mix of Option 3 as a ‘next stage’. Midway through writing this post (on the iPad I might add) – I realise that a Project Roadmap might be the most interesting thing to do for the outcome of this project.
So perhaps that’s what I’ll do – while Option 1 requires forking out money, it also avoids the risks of Jailbreaking my device, but also means I have applicaiton and hardware support continued for my iPad. It means my Laptop still gets some utilisation, and a purpose to it, rather than the costs of expensive hardware not being hosted within my own home.
Once I’m more comfortable in doing everything I possibly can on the iPad while away from home, I’ll migrate to a full blown desktop PC experience.
I’m a big fan of Trello. I love it a lot, it’s free, it’s simple, it’s intuitive. And recently, I’ve been looking into ways I can manage projects from a higher level view instead of a per project kanban-style in-depth view.
I’ve decided to see if Trello might actually be able to help with that.
Why do this?
Initially the value of doing this might seem frivolous; but it gives me a chance to see at any given time, the ‘active’ projects I have on my plate at any given time. Using a traffic light system, I’ll know the status of any various projects as well!
Instead of trying to keep a mental checklist of everything I’m up to, this Trello board should help me keep track of things that need to be done for a variety of different topics. Therein, I think, lies the value in doing this experiment. If successful, it’ll improve my time deficiencies, and issue tracking capabilities on a personal level.
Methodology
I’ll be using this Trello board (it’s also the Projects link on my main menu up the top of the site) to organise my Projects into different categories. Things will be sorted as:
- Each category forms a list
- Each project in that category is a card
- Tasks/To-Do in each project is in a checklist
- Comments are used to provide updates on the project
- Projects can be labelled based on the status of project:
- Green = Project is considered released (it may have upgrades and extra tasks to do)
- Yellow = Project is in active development
- Orange = Project is in conceptual/planning stages
- Red = Project halted/unstarted
Here’s a screenshot of a few projects in how I’ve organised things right now

Hopefully, by doing things this way, I will be able to keep a rolling project log through the Comments section of each of those project cards.
Expected Benefits
Greater focus on completing and achieving project outcomes; and less time spent procrastinating on what needs to be done amongst the many projects in my mind.
In conclusion (random musings)…
Prior to the start of this year, (we’re only 4 months in…) I really spent a lot of time looking at various tools and just using them at face value, never really looking into how I could best use them, nor did I feel the need to really de-clutter my life. However, the turning point I believe, was picking up the habit of Bullet Journalling, and the start of my new career opening some doors for me on how to declutter the most messy part of my life (aside from my career itself)) – my tech/gadgets and gaming habits.
I’ve since looked at the tools I have available to me, and really decided to try out using them to their better (if not greatest) effect so that I can hopefully be a bit more minimalist with my life, less wasteful and more efficient.